Getting your audio setup to play nice with imitone and your DAW (music-making software) can get a little complicated, especially when low latency is important for keeping rhythm (and it usually is). We hope this in-depth guide will help you to pick the best approach to connecting imitone for your creative projects.
A good imitone setup should usually provide these two things:
voice feedback (helps pitch)
imitone is easier to use when you can hear your own voice, together with the sounds you’re controlling. When these are equally loud, they will help you with pitch and rhythm. This can even help to train your singing pitch.
It’s best if you can play your voice back through headphones as you sing. This is called monitoring. A professional-style audio recording interface can monitor your voice without any delay. imitone’s sound button or an audio track in your DAW can also act as a monitor, but will add a small delay.
low latency (helps timing)
Latency is the time between a sound you make and the note played by a virtual instrument. When latency is high, it’s difficult to keep musical rhythm. This is especially important for fast music with rhythmic instruments like guitar and piano.
Latency is measured in thousandths of a second, or “milliseconds”. Audio professionals often use 30 milliseconds (about 1/30 of a second) as a baseline for playing well. Lower is better! To get low latency on Windows, you’ll need to use some kind of exclusive audio rather than normal shared audio.
This guide covers Mac OS, Windows, and VST plugin setups for connecting imitone with your DAW.
basic audio setups
Your DAW (music-making software) has the ability to record an audio input (such as a mic) and play it to an audio output (headphones or speakers). It can also record musical notes from a MIDI input (such as imitone or a USB piano keyboard).
Modern music-making software organizes your project into tracks, where each track is based on audio or MIDI. A MIDI track is usually a virtual instrument that can play notes from imitone.
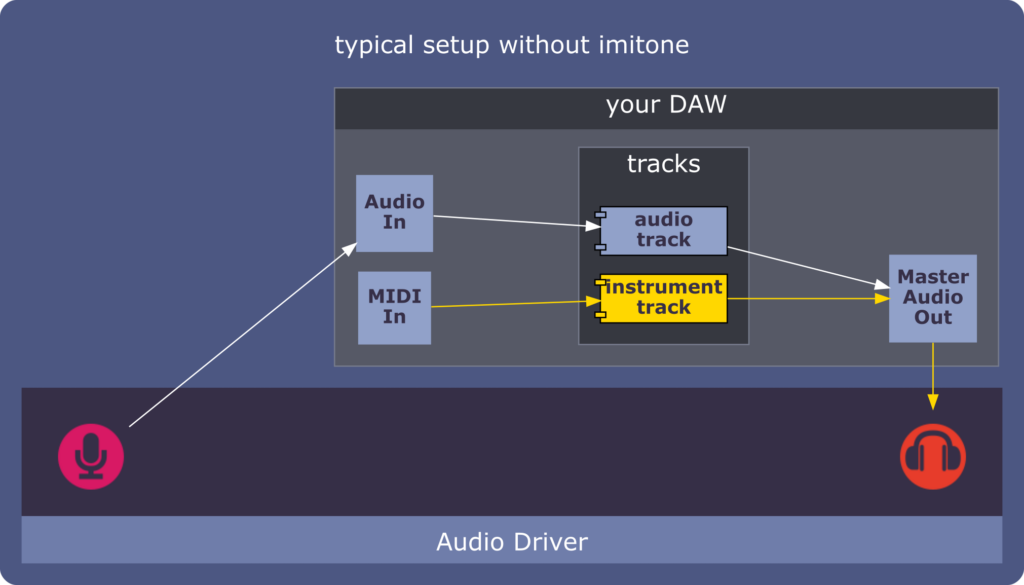
The “Audio Driver” could be your PC’s built-in sound, a USB headset, a pro audio recording interface or some other plug-in mic or sound device.
Notice the instrument track, colored gold above. imitone listens to your mic and makes MIDI notes to control the instruments in your project. The simplest way to do this is with the imitone app, which can also play your voice back to your headphones with the sound button.
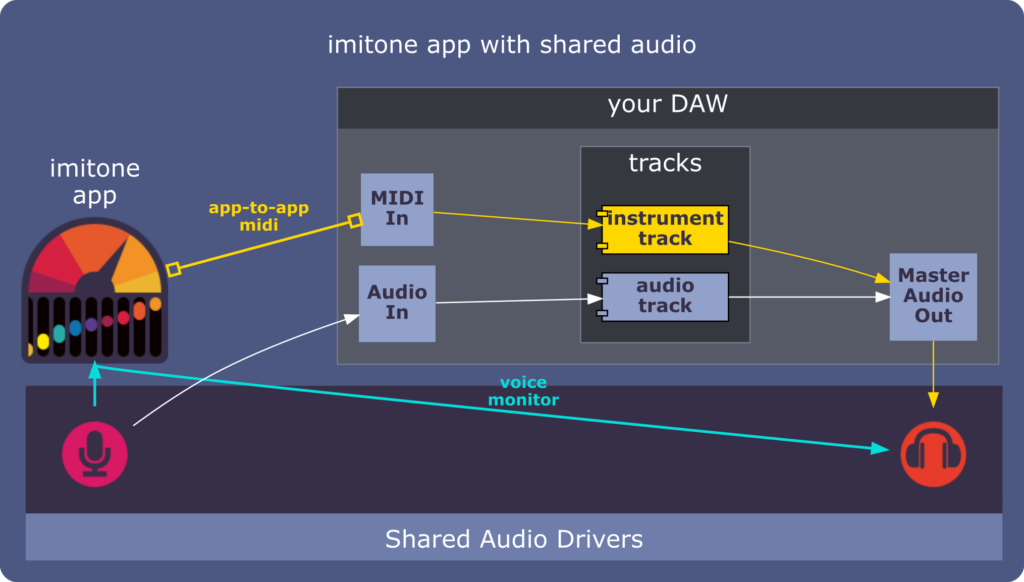
The instrument (gold arrow) is controlled by the imitone app and plays from your DAW.
Voice feedback (blue arrow) is coming from imitone with its sound turned on.
The simplest setup is to share your mic between imitone and your DAW. This usually works well if you’re using Mac OS, if you have special “Multi-Client ASIO” drivers on Windows, or it’s not important to have low latency so you can keep rhythm.
Unfortunately… low latency, rhythm and timing are almost always important. On Windows, shared audio has way too much latency for playing most styles of music, and special “Multi-Client ASIO” gear is needed to share low-latency audio between apps. Even on Mac OS, some audio drivers will start to glitch if you try to run imitone and your DAW at the same time. We can achieve glitch-free low-latency sound by using exclusive audio with the imitone app, or by using imitone’s plug-ins.
exclusive audio with the imitone app
There is no universal software solution for low-latency shared audio on Windows. Instead, we need to give each app exclusive access to any audio devices it’s using. There are two ways to do this with the imitone app.
If you have two or more audio devices, you can use one of them for imitone and the other one for your DAW. For example, you could use a USB headset or an audio interface box in addition to your computer’s built-in sound card.
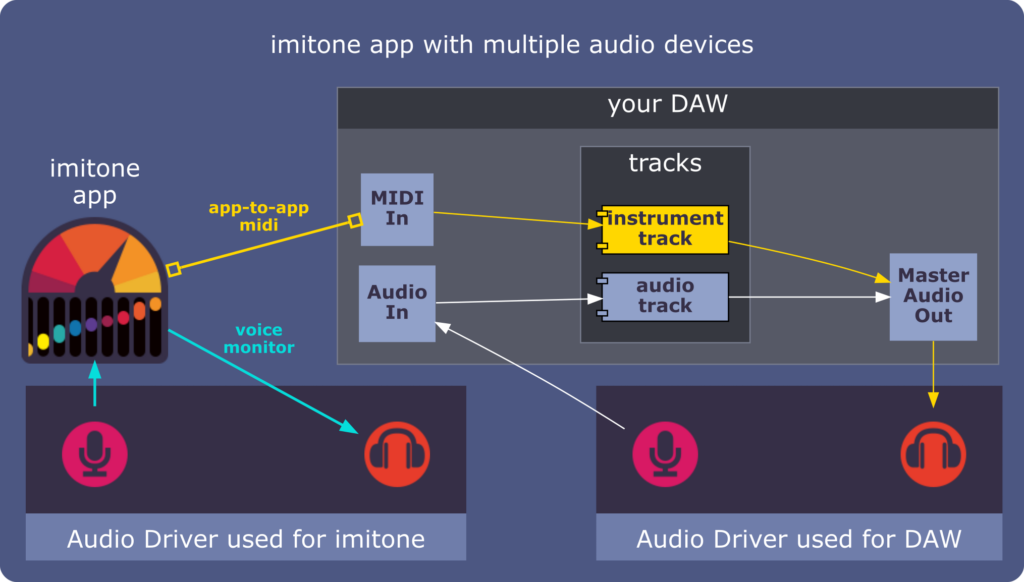
But good luck figuring out how to wear two pairs of headphones at the same time…
But what if you don’t have extra audio gear? You might be using a laptop, or a professional recording studio that runs everything through one big mixer. In these situations we can compromise by giving imitone your audio input (mic) and giving the DAW your audio output. Most audio drivers don’t have any problem with this special form of sharing.
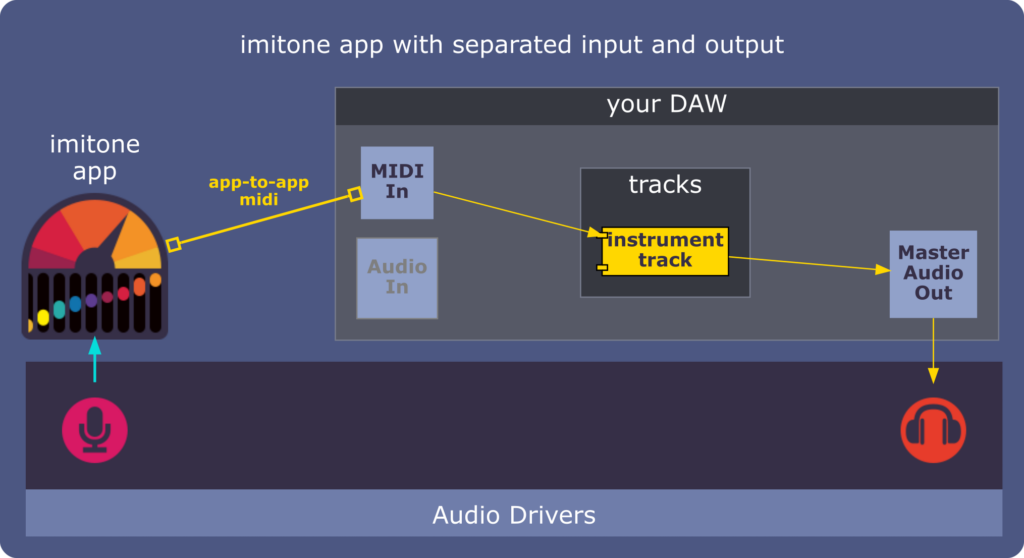
This will let you use exclusive audio for low latency, but it doesn’t help you hear your own voice.
This approach is an easy way to get a low-latency setup on almost any computer, but it has a big disadvantage: you can’t use imitone’s sound button as a voice monitor without using shared audio. Sure, you could just wear your headphones with one ear and listen for the natural sound of your voice… But better things are possible.
using imitone’s plug-ins with your DAW
imitone’s plug-ins run inside your DAW, avoiding the need for two apps to use audio at the same time. This makes it easy to get both low latency and voice feedback; you’ll only need to worry about the MIDI part of your setup.
Our plug-ins are only available on Windows at the moment (where they’re needed most). The way they work is unconventional: when using the imitone plug-in, the imitone app will appear to control it. In this mode the imitone app won’t use any audio; it’s just an interface to the plug-in. By default, our app will dock with your DAW, but you can use the pop out button to make it a free-floating window.
imitone plug-ins must be placed in an audio track in your DAW. Usually you’ll want to set the track to listen constantly for your voice — otherwise imitone will stop hearing you when you pick an instrument. It’s also useful if the imitone track is always playing its audio to your headphones, providing a form of voice feedback. The steps for setting up a track like this vary depending on your DAW.
The plug-ins have two different ways to send MIDI. They have a built-in MIDI output, which you can usually connect to other tracks in your DAW. Alternatively, you can use app-to-app MIDI as with the normal imitone app.
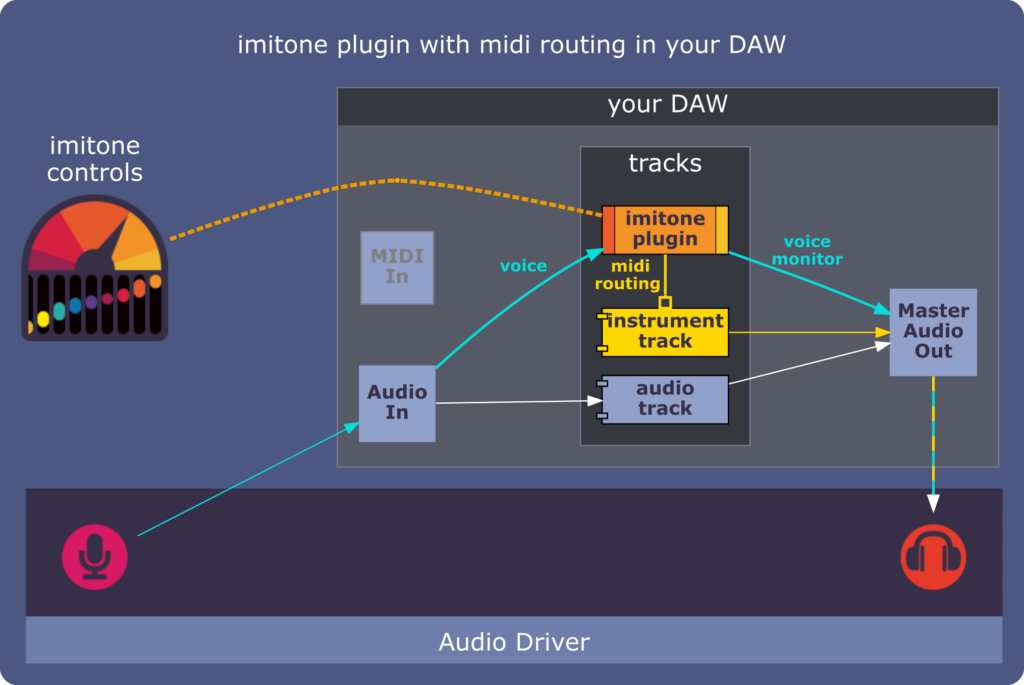
The imitone app is still there, but it’s just acting as controls for the plugin, whose MIDI is routed to the instrument track.
Setting imitone up with a MIDI routing is very tidy and self-contained, but requires some familiarity with your music-making software. It’s done differently in each DAW, and some software doesn’t support MIDI output from plugins at all. Additionally, it may be necessary to edit your routings every time you need to change which instrument imitone is controlling. That’s why we provide an app-to-app option:
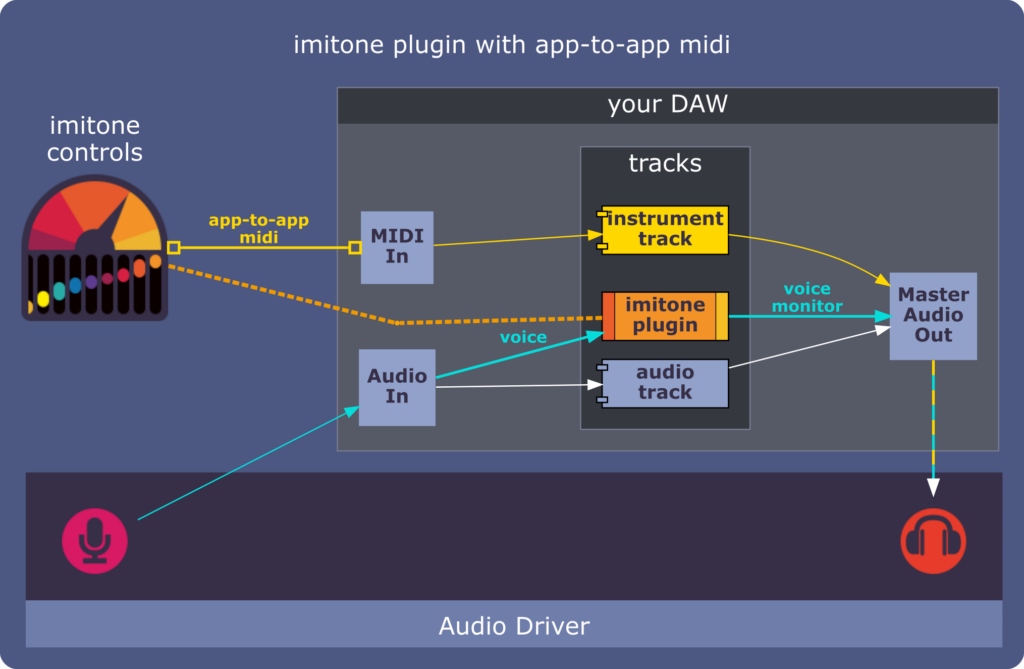
This works just like plugging in a physical MIDI controller, and makes it easy to control all the instruments.
App-to-app MIDI with the plugin is the most reliable and convenient way to use imitone plug-ins, once it’s properly set up. We’re still fine-tuning this feature, though, and it can be tricky to set everything up in the right order:
- Make sure the imitone app is open (it appears when viewing the plugin’s controls).
- Click “pop out” to separate imitone’s window from your DAW and keep it open.
- Make sure “app-to-app midi” is selected as imitone’s MIDI output in setup.
- Afterwards, you may need to visit your DAW’s MIDI input settings to select or refresh “imitone app-to-app” MIDI input.
After setting up app-to-app MIDI from the plugin for the first time, try doing things in this order:
- Open the imitone app.
- Set imitone’s audio input to “none”.
- Open your DAW and load your project with the imitone plugin.
These steps will make app-to-app MIDI available when your project loads, so everything starts up fully connected.